Introduction Edit Page
Controllers
In Ember.js, controllers allow you to decorate your models with display logic. In general, your models will have properties that are saved to the server, while controllers will have properties that your app does not need to save to the server.
For example, if you were building a blog, you would have a
BlogPost model that you would present in a blog_post template.
Your BlogPost model would have properties like:
titleintrobodyauthor
Your template would bind to these properties in the blog_post
template:
In this simple example, we don't have any display-specific properties or actions just yet. For now, our controller just acts as a pass-through (or "proxy") for the model properties. (Remember that a controller gets the model it represents from its route handler.)
Let's say we wanted to add a feature that would allow the user to
toggle the display of the body section. To implement this, we would
first modify our template to show the body only if the value of a
new isExpanded property is true.
You might think you should put this property on the model, but whether the body is expanded or not is strictly a display concern.
Putting this property on the controller cleanly separates logic related to your data model from logic related to what you display on the screen. This makes it easy to unit-test your model without having to worry about logic related to your display creeping into your test setup.
A Note on Coupling
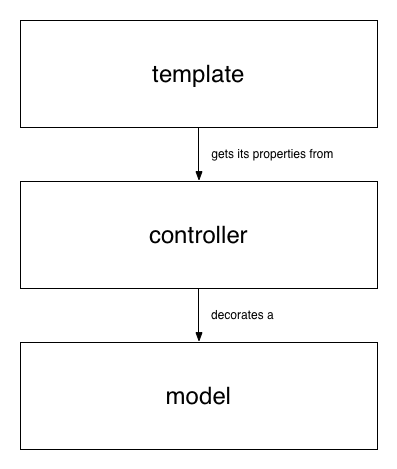
In Ember.js, templates get their properties from controllers, which decorate a model.
This means that templates know about controllers and controllers know about models, but the reverse is not true. A model knows nothing about which (if any) controllers are decorating it, and controller does not know which views are presenting its properties.
This also means that as far as a template is concerned, all of its properties come from its controller, and it doesn't need to know about the model directly.
In practice, Ember.js will create a template's controller once for the entire application, but the controller's model may change throughout the lifetime of the application without requiring that the view knows anything about those mechanics.
This makes it easy to test a template in isolation by rendering it with a controller object that contains the properties the template expects. From the template's perspective, a controller is simply an object that provides its data.
Representing Models
Templates are always connected to controllers, not models. This makes it easy to separate display-specific properties from model specific properties, and to swap out the controller's model as the user navigates around the page.
For convenience, Ember.js provides controllers that proxy
properties from their models so that you can say {{name}} in your
template rather than {{model.name}}. An Ember.ArrayController
proxies properties from an Array, and an Ember.ObjectController
proxies properties from an object.
If your controller is an ArrayController, you can iterate directly
over the controller using {{#each controller}}. This keeps the
template from having to know about how the controller is implemented
and makes isolation testing and refactoring easier.
Storing Application Properties
Not all properties in your application need to be saved to the server. Any time you need to store information only for the lifetime of this application run, you should store it on a controller.
For example, imagine your application has a search field that
is always present. You could store a query property on your
ApplicationController, and bind the search field in the
application template to that property.
1 2 3 4 5 6 7 8 9 10 11 12 |
App.ApplicationController = Ember.Controller.extend({
  // the initial value of the `search` property
  search: '',

  actions: {
    query: function() {
      // the current value of the text field
      var query = this.get('search');
      this.transitionToRoute('search', { query: query });
    }
  }
});
|
The application template stores its properties and sends its
actions to the ApplicationController. In this case, when the user
hits enter, the application will transition to the search route,
passing the query as a parameter.