Actions Edit Page
The {{action}} Helper
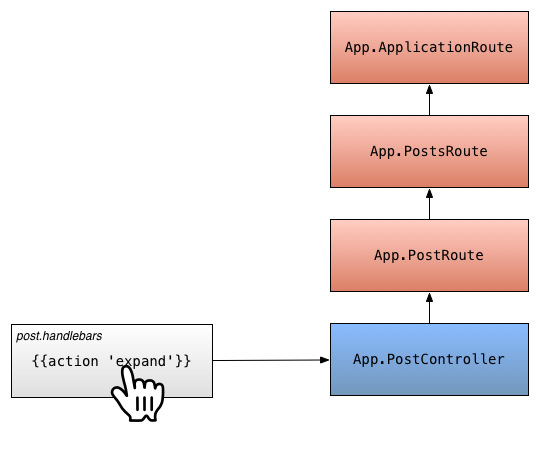
Your app will often need a way to let users interact with controls that change application state. For example, imagine that you have a template that shows a blog post, and supports expanding the post with additional information.
You can use the {{action}} helper to make an HTML element clickable.
When a user clicks the element, the named event will be sent to your
application.
1 2 3 4 5 6 7 8 9 10 11 12 13 14 |
App.PostController = Ember.ObjectController.extend({
  // initial value
  isExpanded: false,

  actions: {
    expand: function() {
      this.set('isExpanded', true);
    },

    contract: function() {
      this.set('isExpanded', false);
    }
  }
});
|
Action Bubbling
By default, the {{action}} helper triggers a method on the template's
controller, as illustrated above.
If the controller does not implement a method with the same name as the action in its actions object, the action will be sent to the router, where the currently active leaf route will be given a chance to handle the action.
Routes and controllers that handle actions must place action handlers
inside an actions hash. Even if a route has a method with the same name
as the actions, it will not be triggered unless it is inside an actions hash.
In the case of a controller, while there is deprecated support for triggering
a method directly on the controller, it is strongly recommended that you
put your action handling methods inside an actions hash for forward
compatibility.
1 2 3 4 5 6 7 8 9 10 11 |
App.PostRoute = Ember.Route.extend({
  actions: {
    expand: function() {
      this.controller.set('isExpanded', true);
    },

    contract: function() {
      this.controller.set('isExpanded', false);
    }
  }
});
|
As you can see in this example, the action handlers are called such
that when executed, this is the route, not the actions hash.
To continue bubbling the action, you must return true from the handler:
1 2 3 4 5 6 7 8 9 10 11 12 13 |
App.PostRoute = Ember.Route.extend({
  actions: {
    expand: function() {
      this.controller.set('isExpanded', true);
    },

    contract: function() {
      // ...
      if (actionShouldAlsoBeTriggeredOnParentRoute) {
        return true;
    }
  }
});
|
If neither the template's controller nor the currently active route
implements a handler, the action will continue to bubble to any parent
routes. Ultimately, if an ApplicationRoute is defined, it will have an
opportunity to handle the action.
When an action is triggered, but no matching action handler is implemented on the controller, the current route, or any of the current route's ancestors, an error will be thrown.
This allows you to create a button that has different behavior based on
where you are in the application. For example, you might want to have a
button in a sidebar that does one thing if you are somewhere inside of
the /posts route, and another thing if you are inside of the /about
route.
Action Parameters
You can optionally pass arguments to the action handler. Any values
passed to the {{action}} helper after the action name will be passed to
the handler as arguments.
For example, if the post argument was passed:
The route's select action handler would be called with a single argument
containing the post model:
1 2 3 4 5 6 7 |
App.PostController = Ember.ObjectController.extend({
  actions: {
    select: function(post) {
      console.log(post.get('title'));
    }
  }
});
|
Specifying the Type of Event
By default, the {{action}} helper listens for click events and triggers
the action when the user clicks on the element.
You can specify an alternative event by using the on option.
You should use the normalized event names listed in the View guide.
In general, two-word event names (like keypress) become keyPress.
Specifying Whitelisted Modifier Keys
By default the {{action}} helper will ignore click events with
pressed modifier keys. You can supply an allowedKeys option
to specify which keys should not be ignored.
This way the {{action}} will fire when clicking with the alt key
pressed down.
Stopping Event Propagation
By default, the {{action}} helper allows events it handles to bubble
up to parent DOM nodes. If you want to stop propagation, you can disable
propagation to the parent node.
For example, if you have a ✗ button inside of a link, you will want to ensure that if the user clicks on the ✗, that the link is not clicked.
Without bubbles=false, if the user clicked on the button, Ember.js
will trigger the action, and then the browser will propagate the click
to the link.
With bubbles=false, Ember.js will stop the browser from propagating
the event.
Specifying a Target
By default, the {{action}} helper will send the action to the view's
target, which is generally the view's controller. (Note: in the case of
an Ember.Component, the default target is the component itself.)
You can specify an alternative target by using the target option. This
is most commonly used to send actions to a view instead of a controller.
You would handle this in an actions hash on your view.
1 2 3 4 5 6 7 |
App.PostsIndexView = Ember.View.extend({
  actions: {
    select: function(post) {
      // do your business.
    }
  }
});
|