Introduction Edit Page
Models
In Ember, every route has an associated model. This model is set by
implementing a route's model hook, by passing the model as an argument
to {{link-to}}, or by calling a route's transitionTo() method.
See Specifying a Route's Model for more information on setting a route's model.
For simple applications, you can get by using jQuery to load JSON data from a server, then use those JSON objects as models.
However, using a model library that manages finding models, making changes, and saving them back to the server can dramatically simplify your code while improving the robustness and performance of your application.
Many Ember apps use Ember Data to handle this. Ember Data is a library that integrates tightly with Ember.js to make it easy to retrieve records from a server, cache them for performance, save updates back to the server, and create new records on the client.
Without any configuration, Ember Data can load and save records and their relationships served via a RESTful JSON API, provided it follows certain conventions.
If you need to integrate your Ember.js app with existing JSON APIs that do not follow strong conventions, Ember Data is designed to be easily configurable to work with whatever data your server returns.
Ember Data is also designed to work with streaming APIs like socket.io, Firebase, or WebSockets. You can open a socket to your server and push changes to records into the store whenever they occur.
Currently, Ember Data ships as a separate library from Ember.js. Until Ember Data is included as part of the standard distribution, you can get a copy of the latest passing build from emberjs.com/builds:
Core Concepts
Learning to use Ember Data is easiest once you understand some of the concepts that underpin its design.
Store
The store is the central repository of records in your application. You can think of the store as a cache of all of the records available in your app. Both your application's controllers and routes have access to this shared store; when they need to display or modify a record, they will first ask the store for it.
This instance of DS.Store is created for you automatically and is shared
among all of the objects in your application.
You will use the store to retrieve records, as well to create new ones.
For example, we might want to find an App.Person model with the ID of
1 from our route's model hook:
1 2 3 4 5 |
App.IndexRoute = Ember.Route.extend({
  model: function() {
    return this.store.find('person', 1);
  }
});
|
Models
A model is a class that defines the properties and behavior of the data that you present to the user. Anything that the user expects to see if they leave your app and come back later (or if they refresh the page) should be represented by a model.
For example, if you were writing a web application for placing orders at
a restaurant, you might have models like Order, LineItem, and
MenuItem.
Fetching orders becomes very easy:
1 |
this.store.find('order'); |
Models define the type of data that will be provided by your server. For
example, a Person model might have a firstName attribute that is a
string, and a birthday attribute that is a date:
1 2 3 4 |
App.Person = DS.Model.extend({
  firstName: DS.attr('string'),
  birthday:  DS.attr('date')
});
|
A model also describes its relationships with other objects. For
example, an Order may have many LineItems, and a LineItem may
belong to a particular Order.
1 2 3 4 5 6 7 |
App.Order = DS.Model.extend({
  lineItems: DS.hasMany('lineItem')
});

App.LineItem = DS.Model.extend({
  order: DS.belongsTo('order')
});
|
Models don't have any data themselves; they just define the properties and behavior of specific instances, which are called records.
Records
A record is an instance of a model that contains data loaded from a server. Your application can also create new records and save them back to the server.
Records are uniquely identified by two things:
- A model type.
- A globally unique ID.
For example, if you were writing a contact management app, you might
have a model called Person. An individual record in your app might
have a type of Person and an ID of 1 or steve-buscemi.
1 |
this.store.find('person', 1); // => { id: 1, name: 'steve-buscemi' } |
IDs are usually assigned by the server when you save them for the first time, but you can also generate IDs client-side.
Adapter
An adapter is an object that knows about your particular server backend and is responsible for translating requests for and changes to records into the appropriate calls to your server.
For example, if your application asks for a person record with an ID
of 1, how should Ember Data load it? Is it over HTTP or a WebSocket?
If it's HTTP, is the URL /person/1 or /resources/people/1?
The adapter is responsible for answering all of these questions. Whenever your app asks the store for a record that it doesn't have cached, it will ask the adapter for it. If you change a record and save it, the store will hand the record to the adapter to send the appropriate data to your server and confirm that the save was successful.
Serializer
A serializer is responsible for turning a raw JSON payload returned from your server into a record object.
JSON APIs may represent attributes and relationships in many different
ways. For example, some attribute names may be camelCased and others
may be under_scored. Representing relationships is even more diverse:
they may be encoded as an array of IDs, an array of embedded objects, or
as foreign keys.
When the adapter gets a payload back for a particular record, it will give that payload to the serializer to normalize into the form that Ember Data is expecting.
While most people will use a serializer for normalizing JSON, because
Ember Data treats these payloads as opaque objects, there's no reason
they couldn't be binary data stored in a Blob or
ArrayBuffer.
Automatic Caching
The store will automatically cache records for you. If a record had already been loaded, asking for it a second time will always return the same object instance. This minimizes the number of round-trips to the server, and allows your application to render UI to the user as fast as possible.
For example, the first time your application asks the store for a
person record with an ID of 1, it will fetch that information from
your server.
However, the next time your app asks for a person with ID 1, the
store will notice that it had already retrieved and cached that
information from the server. Instead of sending another request for the
same information, it will give your application the same record it had
provided it the first time. This feature—always returning the same
record object, no matter how many times you look it up—is sometimes
called an identity map.
Using an identity map is important because it ensures that changes you make in one part of your UI are propagated to other parts of the UI. It also means that you don't have to manually keep records in sync—you can ask for a record by ID and not have to worry about whether other parts of your application have already asked for and loaded it.
Architecture Overview
The first time your application asks the store for a record, the store sees that it doesn't have a local copy and requests it from your adapter. Your adapter will go and retrieve the record from your persistence layer; typically, this will be a JSON representation of the record served from an HTTP server.
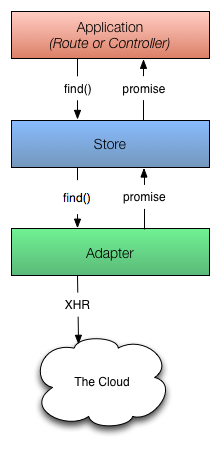
As illustrated in the diagram above, the adapter cannot always return the requested record immediately. In this case, the adapter must make an asynchronous request to the server, and only when that request finishes loading can the record be created with its backing data.
Because of this asynchronicity, the store immediately returns a
promise from the find() method. Similarly, any requests that the
store makes to the adapter also return promises.
Once the request to the server returns with a JSON payload for the requested record, the adapter resolves the promise it returned to the store with the JSON.
The store then takes that JSON, initializes the record with the JSON data, and resolves the promise returned to your application with the newly-loaded record.

Let's look at what happens if you request a record that the store already has in its cache.
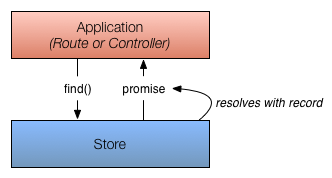
In this case, because the store already knew about the record, it returns a promise that it resolves with the record immediately. It does not need to ask the adapter (and, therefore, the server) for a copy since it already has it saved locally.
These are the core concepts you should understand to get the most out of Ember Data. The following sections go into more depth about each of these concepts, and how to use them together.